Creating Visual Scripts
Using Visual Scripting Workbench you can create ESAPI scripts with a visual programming method, without the need to know how to program C# code.
Visual Scripting Workbench
The Visual Scripting Workbench is used to create and manage visual scripts. You can create, save, open, delete, export, and immediately run visual scripts in Eclipse. You can also import visual scripts from other users who have exported visual scripts for sharing. Advanced users can generate ESAPI script code with the Visual Scripting Workbench, which they can use as a basis for their own custom ESAPI script. You can open and modify only such scripts in the Visual Scripting Workbench that have been originally created there.
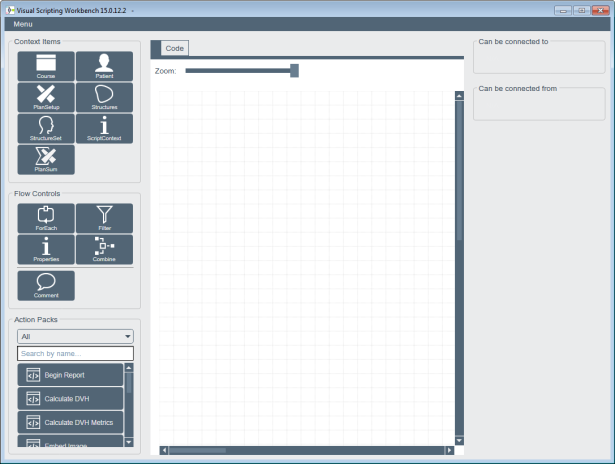
The Visual Scripting Workbench contains three types of script elements---Context Items, Flow Control, and Action Packs. They are dragged to the Canvas to create a script.
 |
|---|
| Figure 14 Visual Scripting canvas |
Action Packs
Action packs are modules that perform a single function. They are similar to macros found in other scripting tools. Action packs accept input data, use the input data to perform a function on that data or in Eclipse, and then send output data to the next action pack in line in the flow. The data that flows between action packs are high-level radiotherapy objects like Patients, Plans, and Structures.
Action packs contain also a few helper objects like a Table which is useful in reporting, export, and presenting logical listings of data; and a Report, which represents an electronic report that is used in visual scripting reporting flows.
Visual Scripting Workbench contains a number of ready-made action packs, and programmers can also create their own action packs to extend the functionality of Visual Scripting. The ready-made action packs are all read-only, but customized action packs created by programmers can be write-enabled.
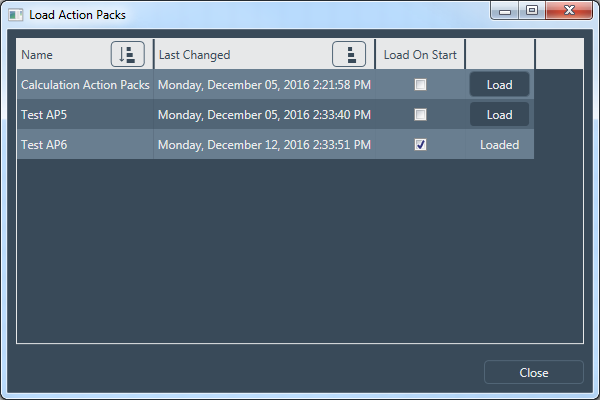
You can manually load custom action packs, or choose which custom action packs to load every time that Visual Scripting is started by choosing the Load Action Packs menu command.
 |
|---|
| Figure 15 Visual Scripting action pack loadder |
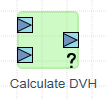
Examples of an action pack:
 |
 |
|---|---|
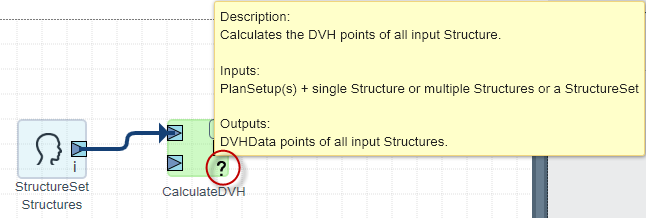
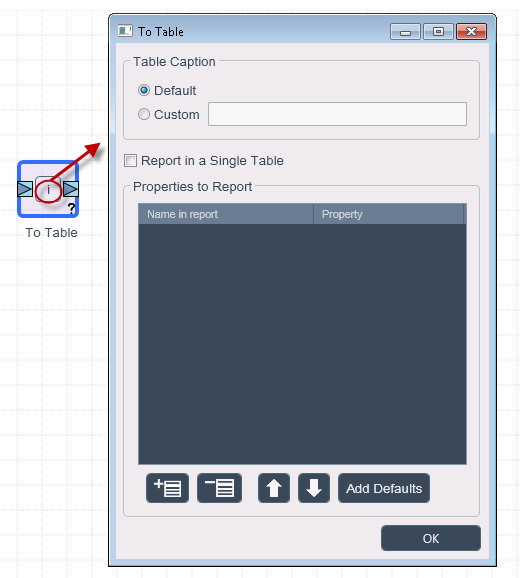
| Figure 16 Calculates the DVH of all input structures. | Figure 17 Formats input information to a table format. Can be used in reporting, export, and in presenting logical listings of data. |
Flow Controls
Using flow controls you can combine action packs into a series of functions. A flow connects the input and output of an action pack. Flow control elements can be used to filter and combine inputs and outputs, and to loop over lists.
| Glyph | Functionality |
|---|---|
 |
The ForEach flow control loops over all items in the passed input list and performs the action pack flow contained within it. Note that looping is normally not required in visual scripting flows since most action packs are capable of taking both single context items and lists of items as input. |
 |
When inserted between action packs, the Filter control filters the context items, such as structures, according to the selected criteria. |
 |
The Properties control changes the item flowing in a visual script to the selected sub-item. This is used to expose items and properties that are present in the Eclipse Scripting API but are not otherwise exposed by context items. |
 |
You can use the Combine control to combine multiple lists into a single list for further processing in a visual scripting flow. |
 |
The Comment control is used for adding documentation to visual scripts. |
Context Items
Context items pass active Eclipse data, such as plan and structure data, to a flow. Context items may include sub-items (for example, PlanSetup may include StructureSets) that you can also use in a flow.
 |
|---|
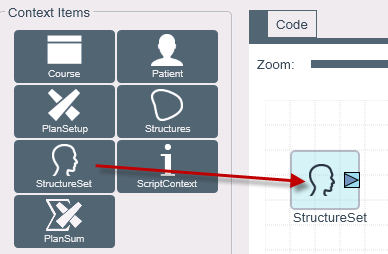
| Figure 17 Retrieves the structure set information from the currently active plan. |
Canvas
Canvas is an area in the user interface, to which you drag the selected script elements, action packs, context items, and flow controls, to form flows. Use the following functions to select the elements and create connections between them.
Drag a script element to the canvas
Select an element and drag it to canvas:
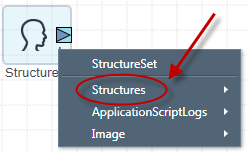
Open the menu of a context item
Click the i icon in the item.

Select a sub-item, if you wish:
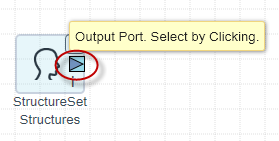
Create a connection between elements
Each context item contains an Output Port to connect the item into other objects. To draw a connection, click the Output Port of the context item:
Each action pack contains Input Ports and Output Ports to connect the action packs into other elements. Drag an Input Port to an Output Port to make a connection.
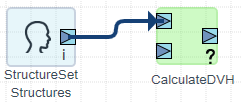
If the line turns orange, the created connection is invalid, or, the validity of the connection depends on the previous input elements in the flow. You can remove an invalid connection by hovering over the middle part of the line, and clicking the X button.
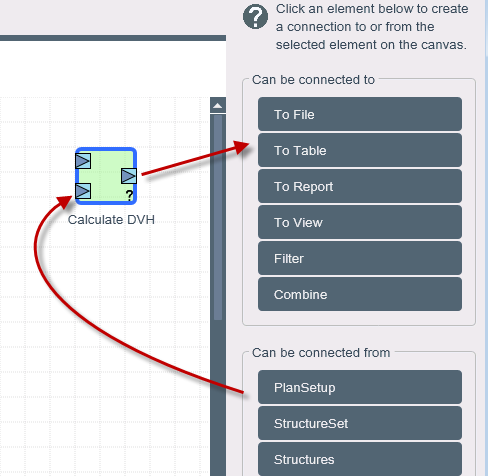
Use the connection pane for creating the connection
The connection pane shows the script elements that can be used as inputs or outputs of the selected element:
 View accepted inputs and outputs of an action pack
Hover over the question mark in an action pack to view what kind of inputs and outputs it accepts:
View action pack settings
Some action packs may need additional settings configured in order to properly execute in a visual script. For example, the ToFile action pack needs to know the path to the file where data will be saved. You can view and edit action pack settings by clicking the i in the element.
Example---Visual Script for Calculating DVHs
The simple visual script below calculates dose volume histograms (DVHs) for all structures of the active patient and displays them. The CalculateDVH action pack has two inputs and one output. Its function is to calculate the DVH for all structures passed to it for the specified plan and output those DVHs. Inputs to this action pack are the active PlanSetup and the active structure set (StructureSet Structures) in Eclipse. The output is a DVH object, which is the input of the ToView action pack.

Create and Test a Visual Script
You can access the Visual Scripting Workbench in Eclipse External Beam Planning and BrachyVision. To create a visual script:
- In Eclipse, select Tools > Visual Scripting. The main window of the Visual Scripting Workbench appears.
- Select an action pack to start your flow and drag it onto the canvas.
- Add other necessary action packs and context items to the canvas and connect them by using the following options:
- Click the Output Port triangle in an element. The application suggests an element to which to connect by showing a dotted line to the Input Port of the element. To confirm the connection, click the triangle again. To remove the connection, hover over the middle part of the line, and click the X button.
- Click the element and choose another element to which you want to connect in the upper right corner under Can be connected to or Can be connected from.
Note
For some of the action packs and context items, you can further define what kind of information is retrieved and how. To view additional options, click the i button in the element. To remove an added element from the canvas, hover over the right upper corner of the element, and click the X button.
- Use flow controls as an aid if you wish.
- When all inputs have been defined, test the visual script in Eclipse.
- Go to Menu > Save and Execute in Eclipse.
Run a Visual Script
To run a visual script in Eclipse, choose Menu > Save and Execute in Eclipse.
Save a Visual Script
To save a visual script, choose Menu > Save, or Menu > Save As. The script is stored in a user-specific folder on the server.
Add a Visual Script as a Favorite
To add the script to the Eclipse Tools menu as a favorite, choose Menu > Add to Favorites.
To remove a script from the Tools menu, choose Menu > Delete from Favorites.
Export and Import a Visual Script
To export a script, choose Menu > Export.
To import a script, choose Menu > Import.
Create or Delete Scripts
To close the current script and create another script, choose Menu > New Script.
To delete a script, choose Menu > Delete.
Example: Create a Visual Script for Calculating DVHs
To create the example visual script illustrated in Example---Visual Script for Calculating DVHs:
In Visual Scripting Workbench, drag the CalculateDVH action pack onto the canvas.
While the CalculateDVH action pack is selected, click on the ToView action pack in the Can be connected to section on the top right.
Select the CalculateDVH action pack again, and click the PlanSetup context item in the Can be connected from section on the middle right.
Click the StructureSet > Structures context item to finish the flow.
Example Visual Scripting Flows
This section describes how to achieve a few typical activities with visual scripting.
Create a Custom Treatment Planning Report
You can create customized treatment planning reports that display only the selected properties, for example, of a structure set.
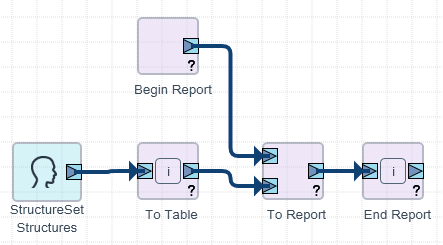
The following flow creates a PDF report that includes a table with the ID, volume, and type information of all structures. The PDF is created when the script is executed in Eclipse.
- In Visual Scripting Workbench, drag the BeginReport action pack onto the canvas.
- Add reporting elements as desired. For example, to report on the properties of loaded structures, send StructureSet Structures context item to the ToTable action pack and flow that to the ToReport action pack. Finish the flow with EndReport.
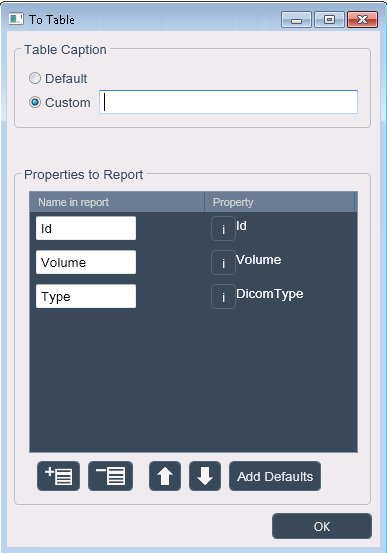
- Configure the ToTable action pack to select the desired properties from the structures and put them in a table. In this case, select the structure ID, the type, and the volume.
Evaluate DVH Metrics
You can evaluate customized DVH metrics using the syntax defined by Mayo, et al. in Establishment of practice standards in nomenclature and prescription to enable construction of software and databases for knowledge-based practice review (Pract Radiat Oncol. 2016 Jul-Aug;6(4):e117--26. doi: 10.1016/j.prro.2015.11.001. Epub 2016 Jan 26).
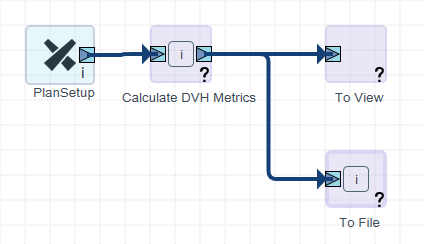
The following flow evaluates user-defined metrics, exports them to a CSV file, and also shows the metrics to the user in a table.
- In Visual Scripting Workbench, drag the Calculate DVH Metrics action pack onto the canvas.
- Add the ToView action pack and connect it.
- Add the ToFile action pack and connect it.
- To define the file to export to, click the i on the ToFile action pack and enter a file name.
- Define the metrics by clicking the i on the Calculate DVH Metrics action pack.
- Use the syntax defined in the Mayo paper for the DVH Objective column.
- You can define an Evaluator by defining Goal and Must criteria, if necessary. If an Evaluator is not defined, the metric will be calculated and reported, but not evaluated.
- To add user-defined priority information to generated reports and tables, enter a value in the Priority column. The entered priority has no effect on processing or evaluation.
- To map multiple structure IDs back to a single ID, use the Structure ID Dictionary. You can, for example, map "Femoral Head Rt" and "Femoral Head Right" to the alias id "fem_head_rt".

Filter Structures Based on DICOM Type
The following example flow sends DVH data for all structures in the active StructureSet to a report.
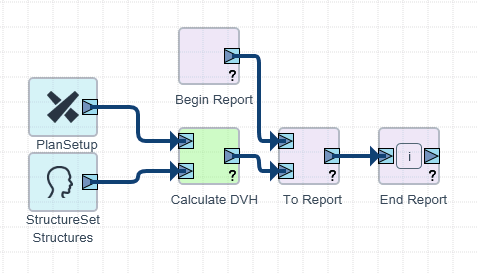
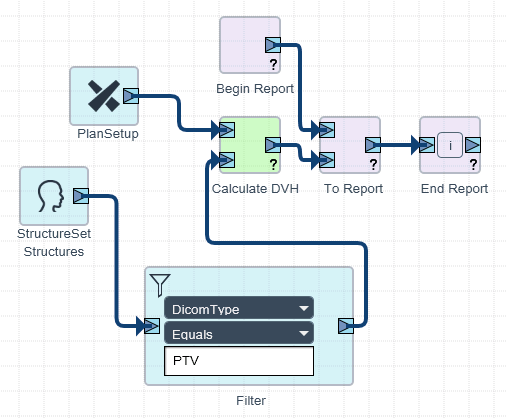
You can limit the flow so that DVH data for PTV type structures only is sent to the report by using the Filter flow control between the Structures context item and CalculateDVH action pack.
In Visual Scripting Workbench, drag all the action packs and context items illustrated in the image below to the canvas.
Add the required connections.
Tip
Drag a Filter control between Structures and CalculateDVH.
- Select DICOM Type and Equals and type PTV into the filter.
Filter and Combine Plans by Status
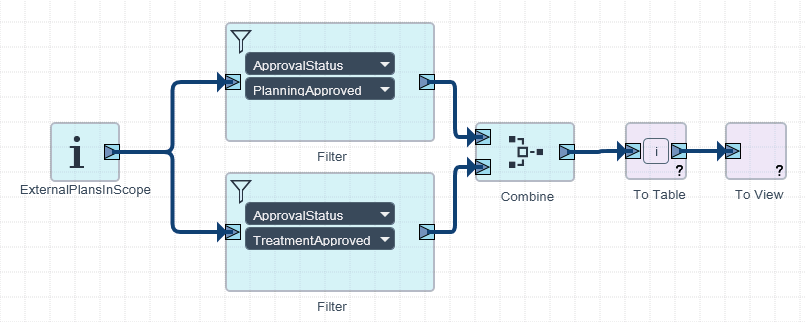
It is possible to use Filter and Combine flow controls together to create more complex visual script flows. You can do this, for example, to create a script that shows a list of all external beam plans with Planning Approved or Treatment Approved status. First you filter the plans to show only plans with planning-approved or treatment-approved status. Then you combine the filtered plans into a single table to view or report.
- Drag the ScriptContext context item to the canvas and choose the sub-type ExternalPlansInScope.
- Drag the Filter control to the canvas and for ApprovalStatus, select the value PlanningApproved. A list of planning-approved plans is created on the Output Port.
- Add another filter for ApprovalStatus with the value TreatmentApproved. A list of treatment-approved plans is created on the Output Port.
- Connect ScriptContext to the Filter controls.
- Add the Combine control and connect it to the Filter controls. Two plans lists are combined.
- Connect the Combine control to a new ToTable action pack. The combined plan list is sent from the Combine control to the ToTable action pack.
- Configure the ToTable action pack by choosing properties of the plans you wish to display in a table (ID, for example) by clicking the i.
- Add the ToView action pack. The selected properties from the plans are put into a table that is flowed to the ToView action pack where the plans list is shown to the user.
Developing Custom Action Packs for Visual Scripting
You can create your own custom action packs to be used in Visual Scripting. The action packs can be either read-only or write-enabled. Write-enabled action packs must be approved In Eclipse prior use in a clinical environment. Before using an action pack in a clinical system, you must follow the same professional software engineering and clinical development practices that you use for developing other scripts.
WARNING
SYRS350.75 The authors of custom scripts are responsible for verifying the accuracy and correctness of the scripts after developing a new script or after system upgrade for the existing scripts. |
Create a Custom Action Pack with the Script Wizard
To create an action pack script with the Script Wizard, follow these guidelines:
- From the Start menu, select Varian > Eclipse Scripting API > Eclipse Script Wizard.
- Enter a name for the new action pack.
- Select the Visual Scripting Action Pack option.
- To select the location for storing the script, click Browse. By default, the action pack project is stored in the user-specific Documents folder.
- Click Create.
- The Script Wizard creates the following folder in the location that you selected if they do not already exist.
- Project folder: Contains a script-specific sub-folder where the Microsoft Visual Studio project file and source code file are stored.
Note
The Script Wizard launches Visual Studio.
- Edit the source code as you wish.
- Compile the plug-in by using Visual Studio (or MSBuild as described in Section "Compile Example Scripts"). The resulting action pack DLL is created in the Plugins folder.
- Copy the custom action pack to the Visual Scripting Action Pack directory in \\server\va_data$\ProgramData\Vision\VisualScripting\CustomActionPacks.
- If necessary, approve the action pack for use in Eclipse.
- In the Visual Scripting Workbench, load the newly created custom action pack and create a flow that uses the new action pack.
To run the new script in Eclipse, choose Menu > Save and Execute in Eclipse.